Monday, March 31, 2008

Families Go Abstract!


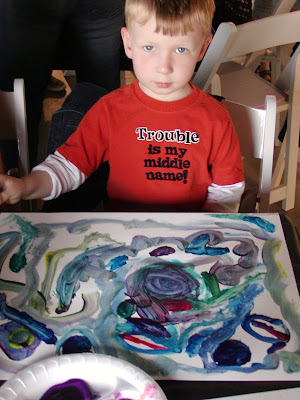
This last Saturday, I was invited to conduct a two hour abstract painting workshop for families and individuals. This was sponsored by a fabulous gallery here in Sacramento called 40 Acres Gallery. They specialize in exhibiting artist from across the nation. In fact, the workshop was on the last day of the Peter Wayne Lewis exhibit. Peter is an internationally known abstract artist. I gave a short lecture on abstract art and off they went. The excitement was the same as when the starting gates open at the Kentucky Derby! The gallery supplied the over 40 participants with watercolor paper, brushes, tempera paints. I brought in tooth brushes (for spattering) and foam rubber daubers. #1 photo sets the scene. #2 photo gives you an idea of the energy. #3 photo is TROUBLE! #4 photo shows a newby artist who decided to sleep instead. #5 photo is a multi tasking participant. What fun they had, what fun I had!

Rollin Down The River


This is the Steamboat Sough Bridge off the Sacramento River. The view is from the slough looking east to the Sacramento River just beyond the bridge. It is an acrylic on canvas (16"X20") painted from a photo taken from the boat of the couple that commissioned me to paint the scene. I posted another view of this bridge in Nov. '07 (also in acrylic but a lot larger- 48"X60"). Like a great deal of my work from reference photos, I ignore a a lot of the colors I see in the photo, and make up my own. Often times, this is not too efficient, because I feel my way around the color wheel to get what I want. I will play and play and play, but it's a great way to find new avenues of painting without scrapping or waiting days for paint to dry. The subtle colors in the sky and slough were definitely not in the photo, and even the tree colors got monkeyed around with. The cool thing is that with acrylic (I've said this numerous times in my blog) is that I can play with colors, values, etc within very short time periods. After all, acrylic dries within minutes. Not cool for oil painters, but I aint no oil painter (some of my best friends are oil painters...and...different strokes for different folks). Because of this easy ability to play, I'm of the opinion that acrylic can be a great medium to learn how to paint even though the student may end up being an "oiler".

Saturday, March 29, 2008

Globe Mill, downtown Sacramento


For about 30 years, this flour milling plant has been in a derelict state. Now it is being transformed into low cost housing units while still maintaining a great deal of its outside structure. I took a photo about 5 years ago before the transformation. From the photo reference, I painted this acrylic on stretched canvas. It's 22"X28". The simple brush technique I used to render the cars was inspired by some of Jennifer McChristian's paintings. She is quite the artist, and you can go to her blog through my links section. Like all my work, I blocked in both cars and building first by lightly drawing with a round tip brush then laying in blocks of color and tone with a large flat brush. After that, it's "simply" a matter of "polishing" up the scene with finer colors, shapes, and tones (values). 1 sketch (draw), 2. block in, 3. polish until I'm are at a point where I can say "done!". I don't like to overly polish, because you can lose that painterly/abstracted look.

Friday, March 21, 2008

Thank You Painting-A-Day Painters!


Last semester when I taught my Acrylic/Oil painting class at Sacramento City College, I had my students painting still life set ups with 3 or more objects. Sometimes I had single objects, but that was less than half the time. This semester, thanks to some painting a day bloggers I've explored ( Jason Waskey, Carol Marine, Aaron Lifferth. See my links), I am having my students paint single objects exclusively for the entire semester. So far, they are loving it. They are not overwhelmed, and they can more better concentrate on things like color mixing, edges, values, brush work, composition...all that good stuff that a beginning artist must learn and explore. The other nice thing about small objects is that each student has their own private still life subject. I have a lot of students and we have little elbow room and really no space for a separate still life set up. And even, if we did, it would be hard for the students to see a single object from a distance. With them having their own objects right by their individual table top easels, there is not that issue. So thanks Painting A Day bloger artists! By the way, my last painting is of a crushed Bodington Beer can. It's an English import with an incredible smooth, silky, creamy texture. Cheers!

Wednesday, March 19, 2008

Iron RR bridge circa 1907


This is an acrylic on MDF board painted en plein air last summer, 2007. It came close to being destroyed in a gigantic railroad trestle fire that spring. I was inspired to post it, because I saw a similar bridge in a painting by one Jared Shear, an artist in Montana. I have him as a link. Check him out.
To paint a complicated structure like this is to get the general gist without getting bogged down in all the details. Please don't count the beams and rivets. Go for the general impression or gesture or (to exercise come German) the gestalt (love that word!).
The words for this post are "gesture", "impression", and "gestalt". One of the secrets behind these words is SQUINT!

Tuesday, March 11, 2008

Painting Into the Sun En Plein Air


This is an acrylic en plein air painting looking over the Yolo Bypass (Fazio Bird Sanctuary). During the winter, excess water from the Sacramento and American Rivers are diverted into this huge lowland area. Even during the summer, a certain amount of water is in this area for all the birds. Anyway, a few weeks ago, I set up my Easy L and faced into the morning sun and haze. No umbrella set up as the sun in the east was still very low. I love fog, haze, smoke, and steam.

Saturday, March 8, 2008

Northern California/Oregon Coast


When the temperature is one hundred degrees plus outside for days on end here in the great central Calif. valley, this is a painting that can cool you down when you look at it (at least in your imagination!). The stormy sky is painted in wet-on-wet right up to the top of the spray. The trees behind the surf, rocks, and foreground waves are painted in wet-on-dry with a touch of exacto knife scraping and picking for some of the water splashing against the rocks.

Friday, March 7, 2008

Birds of a Feather


The swan was painted from a photo I took on a very overcast, grey day. Obviously, I changed the light to a golden sunset. The painting was done wet-on-dry. The brush is totally saturated (not flooded) and is dipped into creamy puddles of color. A watercolor round #16 sable was used for the swan and 1/2 and 1 inch flat watercolor brushes were used to lay down the reflections. This all was painted on non-stretched, 140lb. cold press watercolor paper. I believe the paper was Fabriano Uno.
The rooster (I named him "Brooster") was also painted on Fabriano Uno cold press, wet-on-dry with very quick sumi-like brush strokes. Either it comes out looking good or you tear it in half and start all over again. With my style of watercolor painting, you have to take a philosophical attitude. In other words, you are always ready to "blow" some paintings before you arrive at the "good one".

Wednesday, March 5, 2008

March 1 Watercolor Portrait Workshop


My workshop met on the second floor art studio at University Art in Sacramento. Anyone arriving at the workshop who might have forgotten an art item had only to go downstairs to purchase what they needed. We did a small color study first. I talked about mixing flesh colors for light complextions. I handed out copies of the contour drawing for the student to tape on the studio window. They taped 140lb, cold press watercolor paper on top and traced using a soft office pencil (this workshop focuses on how to handle the medium of watercolor and is not a drawing class).
After my students get back to their painting stations with their traced drawings, I demonstrate how to get started. I answer any questions they may have, then it's their turn to paint, following my lead. We go step-by-step (I demo, they follow, I demo, they follow etc,) until the water color is completed. The first photo is me demonstrating. The second shows some small studies and a large one in progress. The third photo is a student taking a photo during the course of one of the painting stages.